dazzman
xenotilapia
 Mbuna Boy
Posts: 675
|
Post by dazzman on Aug 9, 2012 21:12:36 GMT 11
|
|
moy
xenotilapia
Posts: 669
|
Post by moy on Aug 9, 2012 21:56:10 GMT 11
Looking good mate!
|
|
Craig
Tropheus

Posts: 400
|
Post by Craig on Aug 9, 2012 22:14:03 GMT 11
Great work mate  |
|
timandson
Tropheus
If it's not fish, who cares ?
Posts: 283
|
Post by timandson on Aug 10, 2012 10:19:24 GMT 11
+ 1
Nice shots!
|
|
|
|
Post by neilmar on Aug 10, 2012 12:54:15 GMT 11
hey dazz, i love the oregon mate, i would love to build a cabinet out of it, as this has to be the best timber i have ever worked with, that and cedar,,, cant wait till see the end result mate,,
cheers neil
|
|
|
|
Post by joller on Aug 10, 2012 12:56:35 GMT 11
looks awesome, what method did you use to cut the notches? the look really good
|
|
dazzman
xenotilapia
Mbuna Boy
Posts: 675
|
Post by dazzman on Aug 10, 2012 14:22:17 GMT 11
Thanks guys, Joller I used a sliding compound drop saw to cut the notches out then tidied up with a chisel
|
|
|
|
Post by joller on Aug 10, 2012 16:50:39 GMT 11
haha, thats what i did you should have seen how mine turned out compared to those  |
|
Craig
Tropheus
Posts: 400
|
Post by Craig on Aug 10, 2012 17:17:10 GMT 11
Nice  , Me and wood don't mix - except if its firewood lol  |
|
dazzman
xenotilapia
Mbuna Boy
Posts: 675
|
Post by dazzman on Aug 16, 2012 19:37:28 GMT 11
Thanks guys, finally i have some more progress to report  , this is going to take me a while to complete as i don't have much free time these days. I went through our offcut rack at work and grab out and cut up some plywood and particle board flooring to make up the tank stand plinth. It will never be seen so it doesn't have to look pretty, just be strong. Once i have my plinth front, back and gussets cut out i clear some space on a workbench and begin assembly with a nail gun and some glue.  Once all the gussets and braces are fixed onto one side nice and flush with what will be the top edge i flip it up to nail on the other side. The squaring braces (wide pieces on the flat at either end and in the middle) hold the whole frame square and give me something to screw the tank stand base to.  Here it is finished. I am using a piece of plas ply (the ply wood with the gloss black faces, the sort of material used to form up concrete moulds) as the face of my plinth just to add some resistance to any water that i am sure i will spill from the front of the tank.  At this stage i have set it out where the tank will go in my house and scribed it to the floor. This means levelling it up with packers and copying the shape of the floor onto it then fitting (cutting) it to the shape of the floor. This means that when the tank goes on it will sit perfectly level and have full and consistant support on the floor. |
|
timandson
Tropheus
If it's not fish, who cares ?
Posts: 283
|
Post by timandson on Aug 17, 2012 18:29:41 GMT 11
Looks great, nice job mate!
|
|
Craig
Tropheus
Posts: 400
|
Post by Craig on Aug 17, 2012 20:41:38 GMT 11
Awesome, great skills mate |
|
dazzman
xenotilapia
Mbuna Boy
Posts: 675
|
Post by dazzman on Aug 23, 2012 21:39:37 GMT 11
|
|
|
|
Post by neilmar on Aug 23, 2012 22:54:21 GMT 11
good to see some old school mortise and tenon joints dazz, well done mate
cheers neil
|
|
timandson
Tropheus
If it's not fish, who cares ?
Posts: 283
|
Post by timandson on Aug 25, 2012 17:33:59 GMT 11
Great work mate, your doing an excellent job! |
|
dazzman
xenotilapia
Mbuna Boy
Posts: 675
|
Post by dazzman on Sept 27, 2012 21:12:19 GMT 11
|
|
|
|
Post by neilmar on Sept 28, 2012 0:13:17 GMT 11
these are the v=boards i was talking to you about deano,
looking good daz, cant wait to see the finish product
cheers neil
|
|
dazzman
xenotilapia
Mbuna Boy
Posts: 675
|
Post by dazzman on Oct 1, 2012 21:45:32 GMT 11
|
|
timandson
Tropheus
If it's not fish, who cares ?
Posts: 283
|
Post by timandson on Oct 4, 2012 18:49:56 GMT 11
Good to see things are coming along nicely.
Great work, I can't wait for the final product!
|
|
dazzman
xenotilapia
Mbuna Boy
Posts: 675
|
Post by dazzman on Nov 11, 2012 20:33:26 GMT 11
Thanks very much, here's a quick update. I wanted to concentrate on getting the stand to a stage where i can at least have the tank set up and running so the next step was to stain it, i'll make the doors up later while the tank is cycling. Here is all the equipment that i needed; Walnut coloured stain (water based), fine paint brushes to get into the v joins on the lining boards, 240 grit sand paper,rubber gloves (thin ones like the ones used at the hospital/doctors) and rags (in my case old flanelette pj's).  Firstly i puttied up all the nail holes and imperfections then when the putty was dry i sanded the whole thing with 120 grit sand paper then with 240 grit. Here's the stand ready for staining.  Next was to start staining, i prefer to rag the stain on, you can spray it or brush it but i think ragging gives a better result. You use 2 rags, one for applying the stain and the second to wipe of any excess stain, just remember not to stop too long in one spot with the staining rag as it will result in a dark spot as too much stain sinks in, just keep going quickly until the piece that you're working on is done. Here's a progress shot.  and after the first coat  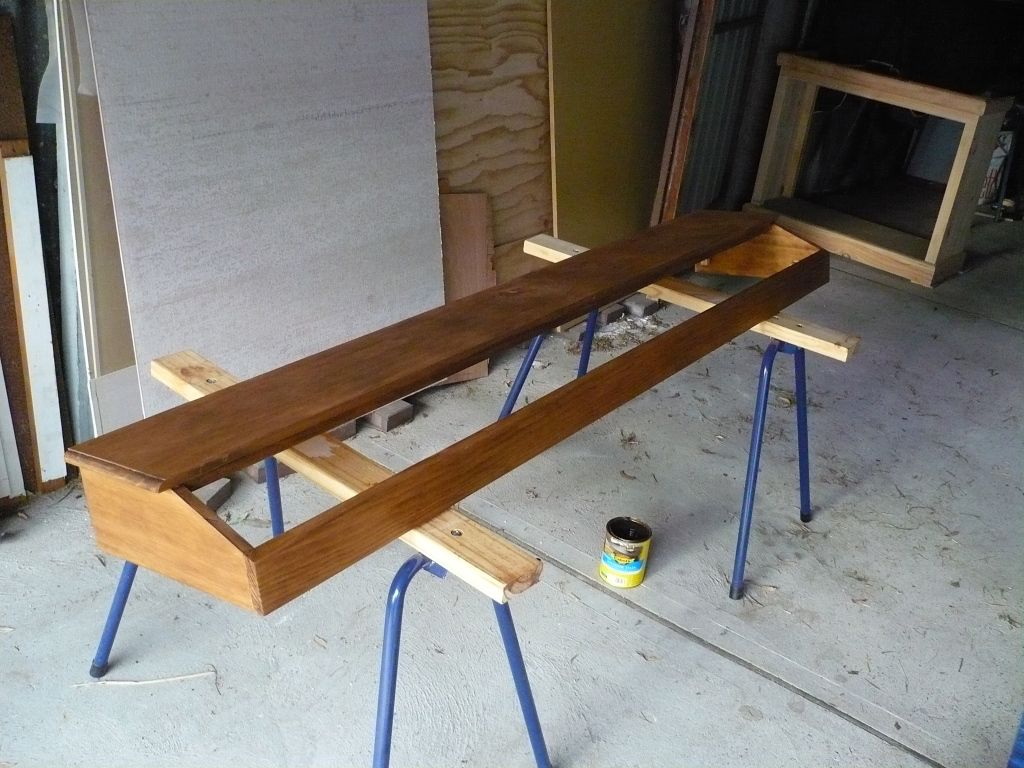 |
|
Craig
Tropheus
Posts: 400
|
Post by Craig on Nov 12, 2012 20:17:39 GMT 11
Looks a million bucks  Geez u could do that for a living ... |
|
dazzman
xenotilapia
Mbuna Boy
Posts: 675
|
Post by dazzman on Jan 11, 2013 21:58:21 GMT 11
Thanks Craig. I ended up giving it 2 coats of stain to darken it up a little bit, the second coat didn't achieve a lot, it did darken it a little bit but not as much as i thought it would. After the staining i borrowed a mates air compressor to spray the sealer then the clear top coat.  I gave it about 3 coats of sealer and a couple coats of clear which ended up looking like this.  I plan to run 2 canister filters and 2 2 foot spitting tanks inside this stand so i put every thing in to see how it all fits and where i will need to cut out access for the filter pipes. Now you can see why the 2 inner rear posts were set where they are, to give enough room for the spitting tanks.   With the filters in the stand i worked out how big i needed to cut the filter pipe access and marked it out on the back. Next i used a hole saw in each corner (for best results drill from both sides, this prevents a big blow out and gives a nice clean hole edge on both faces) and a jig saw to cut my access.   I just brushed some sealer all around the cut out section to give it a little bit more water proofness. Now the stand was ready to go inside the house, WOO HOO!!! |
|
Craig
Tropheus
Posts: 400
|
Post by Craig on Jan 13, 2013 17:04:55 GMT 11
Looks soooo good!!! |
|
|
|
Post by Admin on Jan 13, 2013 17:14:32 GMT 11
Coming together nicely daz, I'm drooling over that thicknesser.
|
|
|
|
Post by bardus71 on May 13, 2013 20:24:29 GMT 11
Wow. Nice work.
|
|
|
|
Post by jayyskii on Jun 7, 2013 12:46:06 GMT 11
Dazzman,
Did you finish this?
|
|
dazzman
xenotilapia
Mbuna Boy
Posts: 675
|
Post by dazzman on Jun 15, 2013 20:36:09 GMT 11
hey jayyskii, although I am using it no it's still not finished. I have done more to it, I just need to get my finger out and update this thread.
|
|
timandson
Tropheus
If it's not fish, who cares ?
Posts: 283
|
Post by timandson on Jun 16, 2013 12:55:51 GMT 11
Nice work! it's beautiful! |
|


 , Me and wood don't mix - except if its firewood lol
 , this is going to take me a while to complete as i don't have much free time these days.


